How to Install a Polycarbonate Roof on Your Pergola
Installing a roof on your pergola can transform a fair-weather space into an all-weather space for very little money and effort. This is a nice addition if you live in an area that gets a lot of rain and/or direct sunlight, and it's a project that can be accomplished in a weekend. If you want a DIY pergola with a roof, read on! Otherwise, we can custom design you a sloped roof pergola.
Please note that we do not sell pergola roof panels, but we do work with a couple people in the industry that specialize in these types of materials. Austin (adusek@coveryourpergola.com) from Cover Your Pergola specializes in polycarbonate panels for pergola roofs. You may inquire further with him if this would be a good fit for you.
This installation tutorial considers use of polycarbonate roof panels, though it can be adapted for other roofing materials. If your pergola already has a slope to it (we recommend, and most manufacturers specify, a minimum slope of 1:12 or 5 degrees), then you can skip ahead to Installing the H-Channel. Otherwise, if you have a flat-roofed pergola, you can add furring strips to create a slope. However, the slope created in this manner likely won’t get you to a 5-degree slope, which may possibly void the roof’s warranty (you have been warned!).
Jump to:
Installing the H-Channel
Add the Polycarbonate Panels
Moisture Tape and U-Channel
H-Channel Cap
Add Furring Strips to Create Roof Slope
As noted above, you can add a minor slope to a flat-roofed pergola by cutting graduated furring strips and nailing them to the top of your pergola’s purlins. The slope should be a minimum of 1/8″ per foot (0.6 degrees), though 1/4″ per foot (1.2 degrees) is better if you can manage it. Our premade pergola plans typically have purlins spaced at either 6″ or 12″, so determining the furring strip thicknesses is relatively simple.
Cutting the furring strips is easiest done using a table saw, but if you don’t have one, we’ll go through the method to cut them in a fool-proof manner using a circular saw. Using a straight piece of scrap wood as a fence and a couple clamps, you can set your circular saw up to take a uniform thickness cut without having to follow a pencil line. Use a combination square to set the cut thickness, using the edge of the shoe as a guide.

When cutting simply keep the fence tight to the piece of wood you're cutting, and let the saw do the rest!

After your set of graduated furring strips are cut, it’s time to fasten them to the tops of the purlins. This is easily done with a nail gun or with screws. For thinner strips, you may want to pre-drill to prevent splitting. If the screws you use to fasten the polycarbonate panels down are long enough, you don’t have to add a lot of nails/screws to the furring strips as the panel screws will also hold them in place.

Installing the H-Channel
Depending on the size of your pergola, you may have one or more H-channels at the seams between panels. These are for waterproofing so that you don’t get drips between the panels.
The polycarbonate roof system shown here has a two-piece H-channel, with a T-track that gets fastened down first. In this case, it’s fastened in the center of the pergola. The aluminum T-track was first pre-drilled with an appropriately sized bit, and then washer head screws used to fasten it down.

Your roof kit may come with a foam weatherstripping that goes on the top of the T-track flanges. If that’s the case apply this after fastening the T-track down to your pergola.
Next, prep the cap of the H-channel. This one comes with a weatherstripping gasket that must be pushed into the extruded retainer on either edge.

Set the cap aside for the time being, as it can’t be applied until the panels are in place.
Add the Polycarbonate Panels
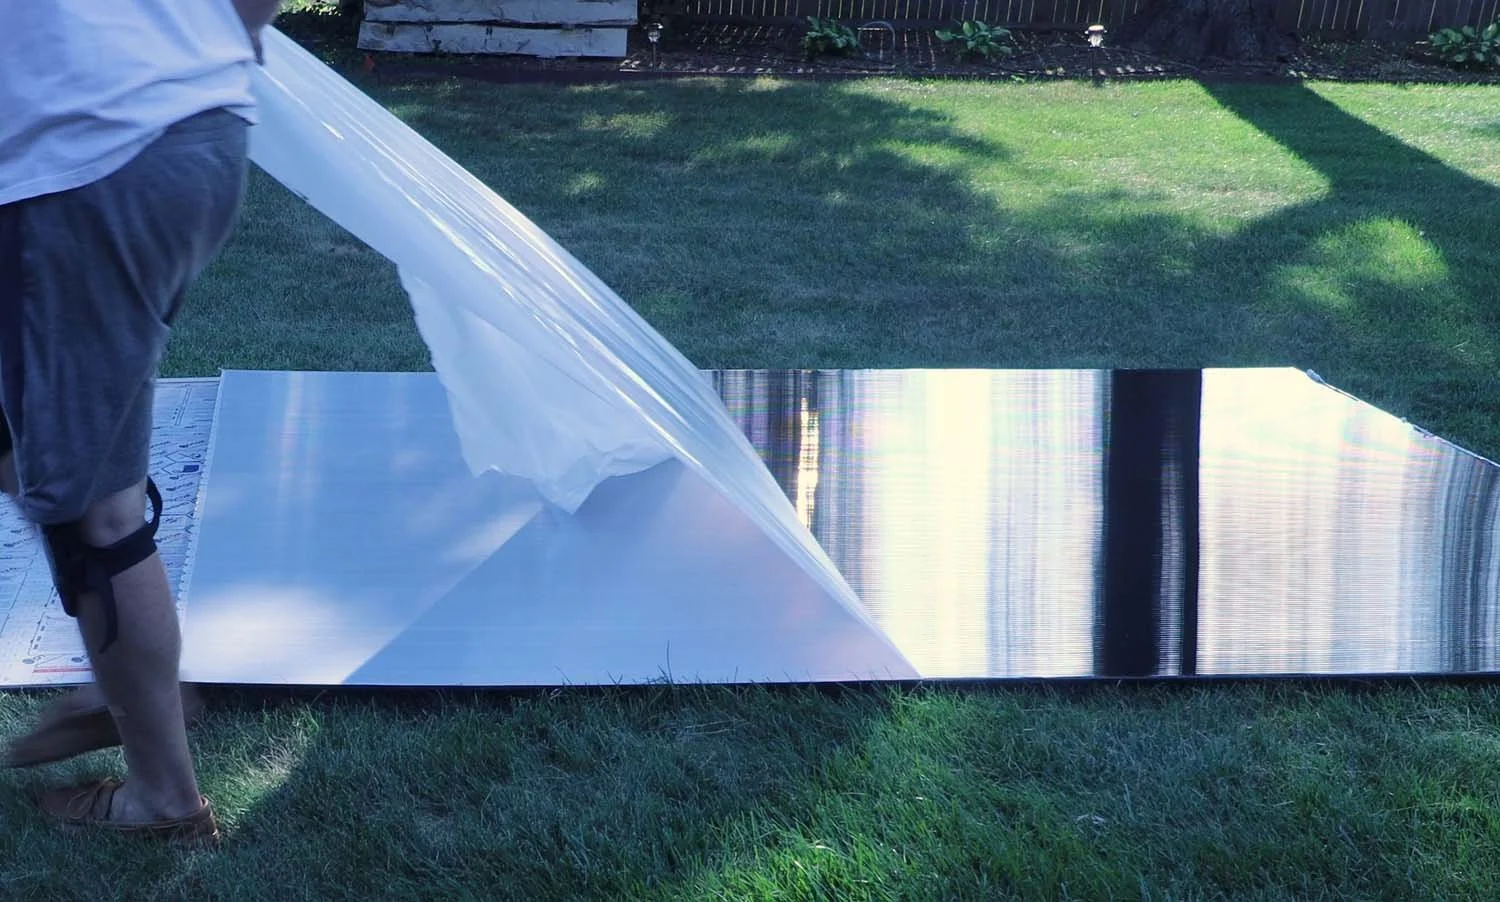
If you have a helper, this step is the ideal time to have him or her give you a hand as the panels can be a little awkward to handle.
The panels likely come with a protective plastic film over them to prevent scratching during shipment, so flip the panels so that the bottom side faces up and remove this film.
If you want, you can add the moisture tape and U-Channel at this point when it’s easier to do on the ground. However, when pre-drilling for the panel fasteners, debris will get in the cells of the multi-wall panel, which will be impossible to get out if the tape is on, so you may want to hold off for now.
Bring the panels up to the roof, being careful not to scratch the exposed bottom. This is where the helper is handy as you both can work together to gently lay the panel down on the pergola. If working by yourself, we recommend sliding the panels up to the roof with the top side down, and then flipping them over.
When moving around on the top of the panels, we recommend laying down a board to help spread out your body weight. Walking directly on the panels could dent them, or you could possibly fall right through!

This roof system uses gasketed washers to keep the fasteners water-tight, which may require a bit of assembly.
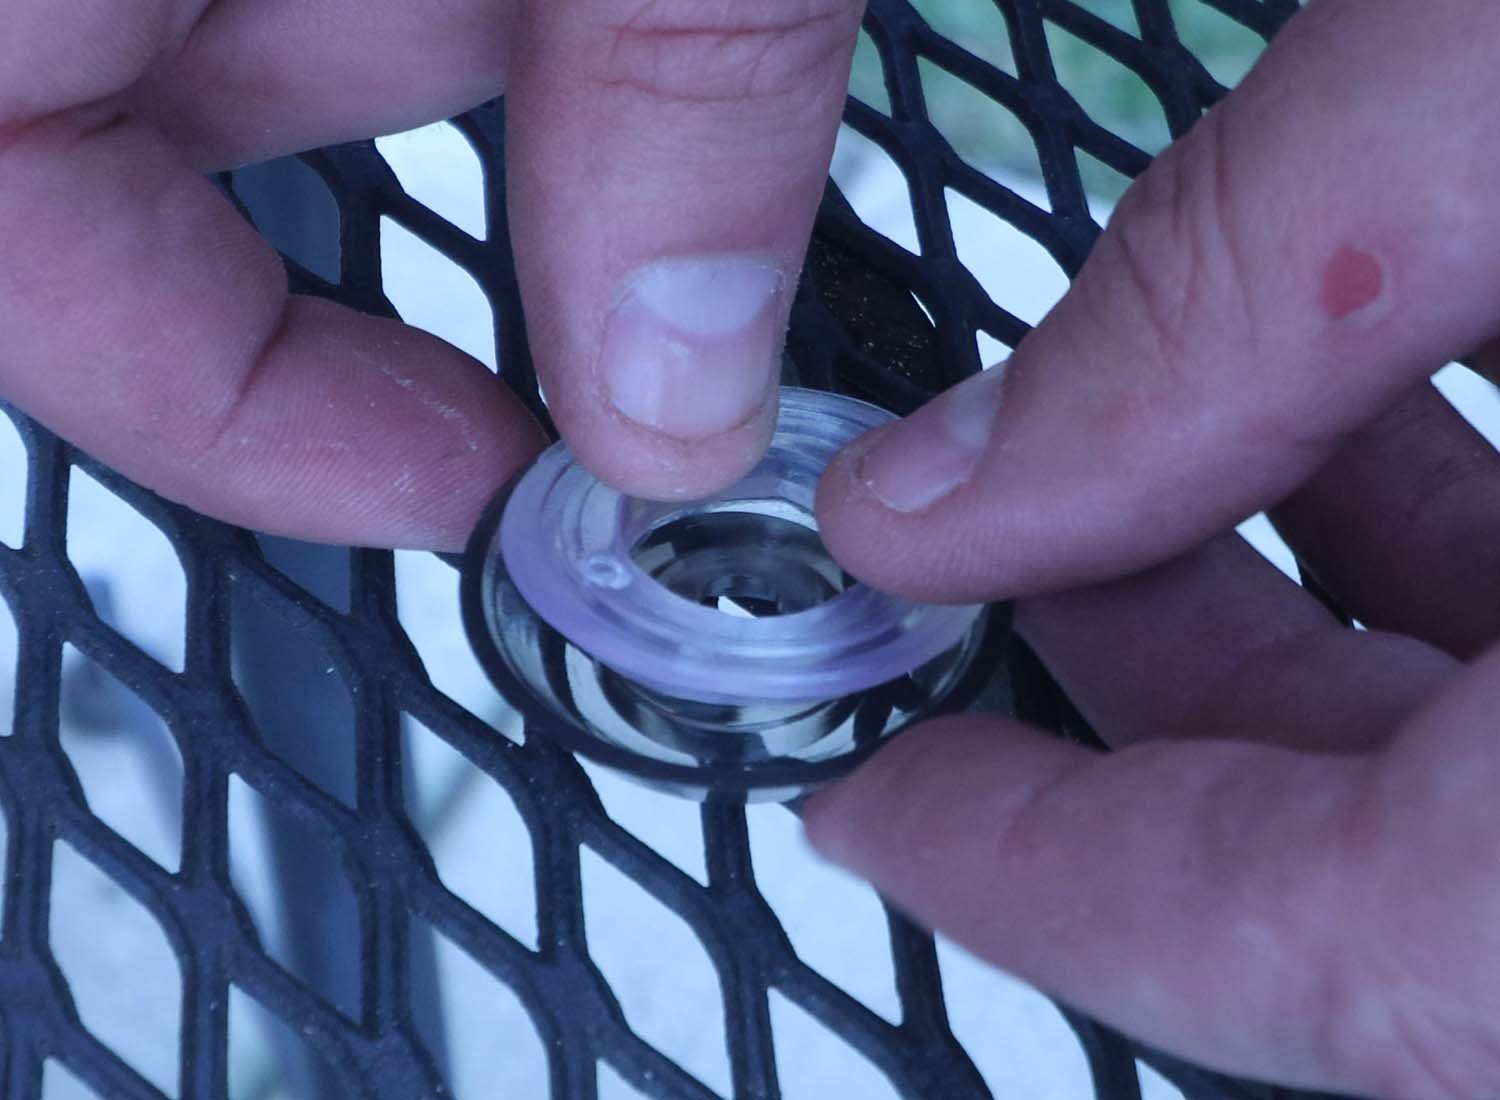
When used to fasten down the roof panels, the fastener goes through the hole in the washer, and a cap is put over the fastener to make it watertight.

With the panels on your pergola and the washers all assembled, now it’s time to fasten the panels down. Using the fastener spacing provided by the manufacturer, start peeling back the protective film and carefully laying out and marking the fastener locations.
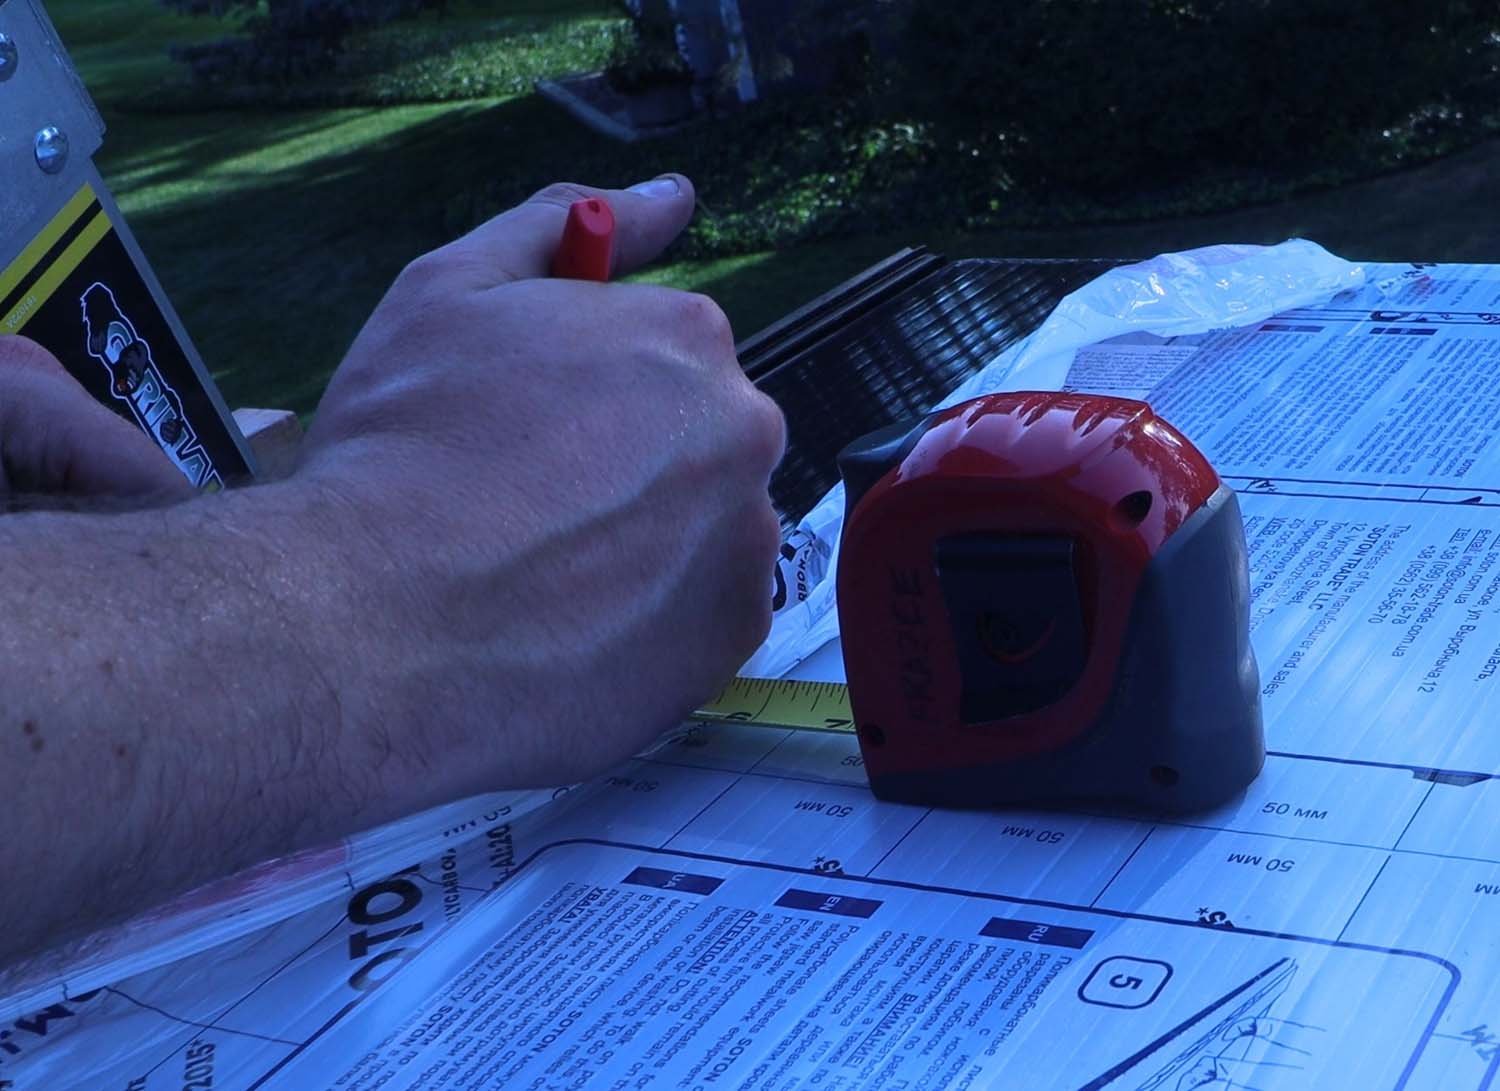
Pre-drill the panels, and fasten down to the purlins. Leave a 1/4″ gap between the panel and the stem of the T-track to allow for expansion and contraction of the panels.

As you move methodically through the panels, you’ll want to avoid “painting yourself into a corner,” to borrow a phrase from another trade. Add the fasteners in such a way that you work your way back to your ladder and don’t have to cross over the finished roof.

After installing all the fasteners (and assuming you haven’t already added the moisture tape), it’s a good idea to use an air compressor with a blow gun to blow the drilling debris out of the cells of the multi-wall panels.

Moisture Tape and U-Channel
Multi-wall polycarbonate must have the open cell ends sealed with moisture tape in order to prevent condensation from occurring. The tape for this roof system has adhesive at the edges, and gets applied over the cut ends of the panels.

To give the ends a finished look, aluminum U-channel is applied. This should be a fairly tight fit, but may be able to be installed using only your hands.

If the U-channel is giving you problems, a drywall taping knife can be used to help it slide into place over the moisture tape.

It’s a good idea to drive the U-channel home with a rubber mallet to ensure that it’s properly seated.

Installing the H-Channel Cap
At this point, the only thing left to do is install the H-channel cap. Recall that you previously applied the weatherstripping gasket to this and put it aside.
Climb back up on the pergola, using a board as necessary to walk on and avoid scratching the roof. Place the cap over the top of the T-track. (Ignore the protective film in the images below - this step was done out of order when we filmed it)

Pre-drill through the cap, and fasten it down to the pergola.

Work your way down the cap, fastening as you go.

After cleaning everything off the roof, it’s a good idea to use a leaf blower to blow off any loose debris for a clean installation.

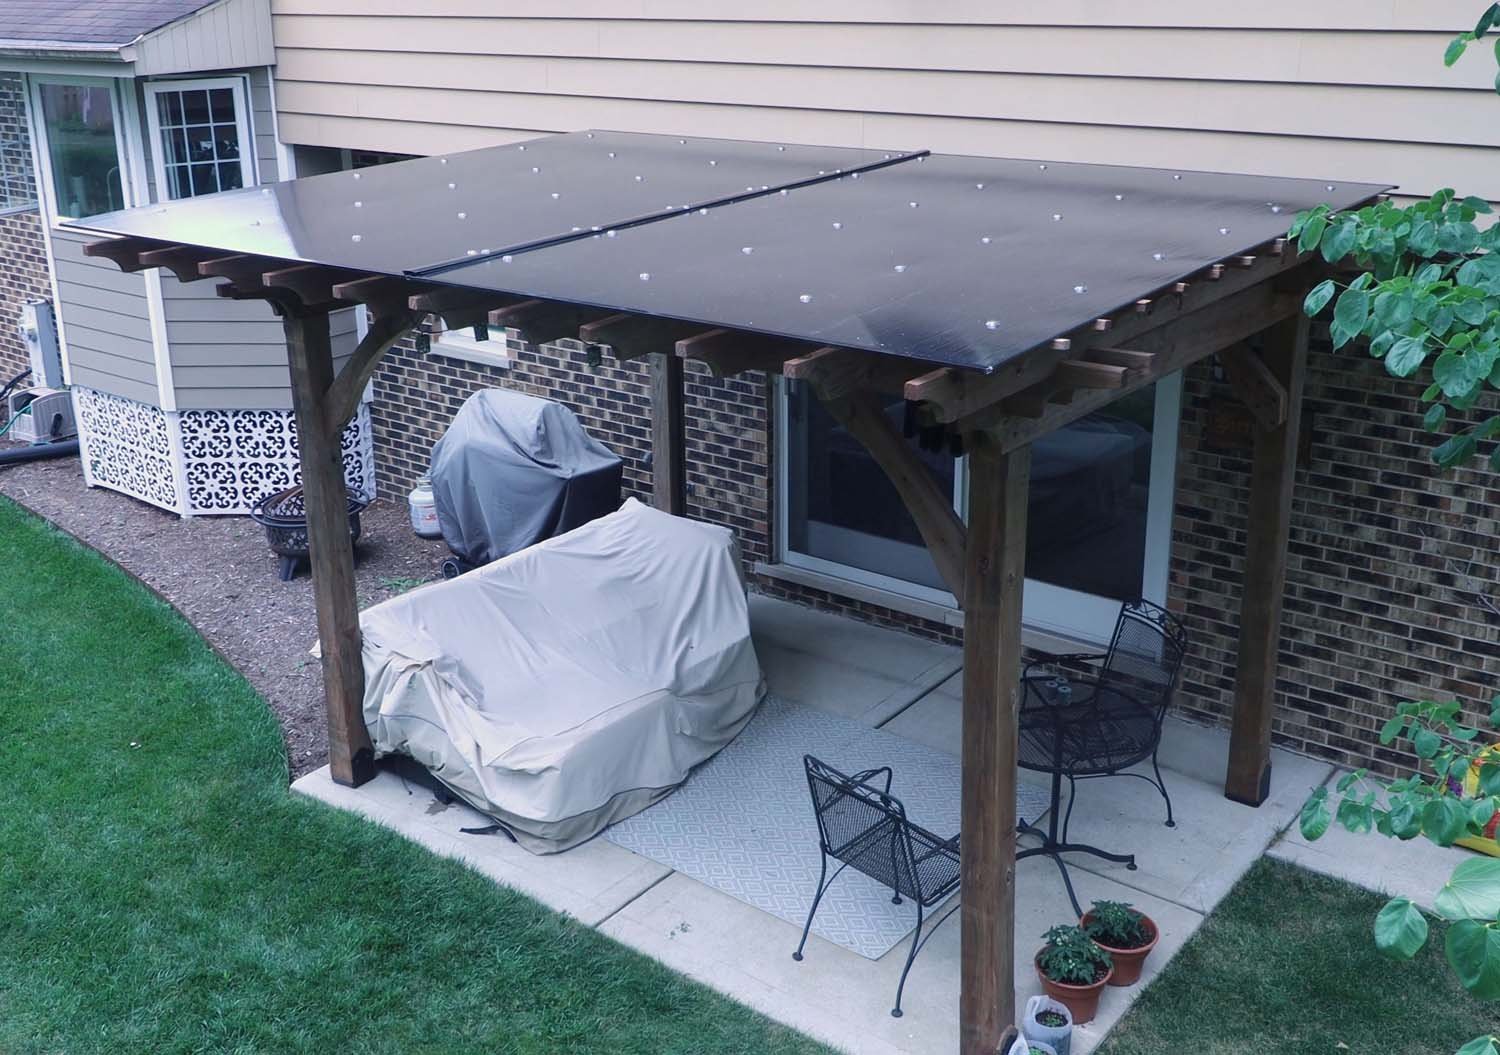
Finished!
At this point, you have successfully added a polycarbonate roof to your pergola! You can now enjoy your pergola even when it’s super sunny or even raining. The roof has the added advantage of increasing the longevity of your pergola, as the wooden pieces won’t get as weathered as they normally would.
Should you have any further questions about installing a polycarbonate roof, feel free to Contact Us. Otherwise, if you are looking for a custom pergola design or premade pergola plans, we do that too!
Instructions provided by Apex Pergola Design are solely for informational purposes and are provided without warranties or guarantees of any kind. Builder/Installer is solely responsible for construction of the pergola and shall be responsible for identifying, reviewing, and complying with the applicable building codes in effect at the time of pergola construction and ensuring the pergola construction complies with such building codes and requirements.. Apex Pergola shall not be liable for any claim, loss or damage arising out of: (a) any misuse or unauthorized usage of the Plans provided; (b) any constructions, structures or designs made by the Client or a third party on the basis and in reliance on the Plans or (c) any other circumstances beyond Apex Pergola’s reasonable control.